 Deutsch
Overview
The ColorVisor provides three main features:
- The Color Scanner to identify colors in the environment via the built-in device cameras.
- The Photo Scanner to identify colors in photos and images.
- The Color Table to store and edit identified colors and to create new colors.
These three parts of the app can be selected in the tab bar at the bottom of the screen and are described in the following sections.
The Color Scanner
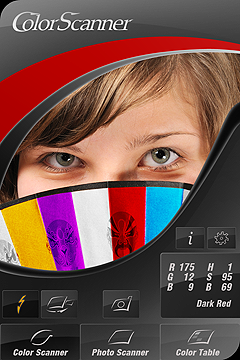 The Color Scanner can be selected by tapping on the left button in the tab bar. It shows the camera view and a scan focus
 ![]() , in the center. The scan focus continuously analyzes the color values. The identified color is shown in the lid-like curve at the top of the camera view. Color details are presented at the bottom right of the screen, right above the tab bar. The RGB components are in the left column, The HSB components in the right column, and the color name below. Color names are yield by compareing the measured color values with a reference color palette. In the Color Scanner Settings (see below), this reference palette may be changed to detect, for example, only the basic colors.
, in the center. The scan focus continuously analyzes the color values. The identified color is shown in the lid-like curve at the top of the camera view. Color details are presented at the bottom right of the screen, right above the tab bar. The RGB components are in the left column, The HSB components in the right column, and the color name below. Color names are yield by compareing the measured color values with a reference color palette. In the Color Scanner Settings (see below), this reference palette may be changed to detect, for example, only the basic colors.
Additionally, the color name will be spoken if VoiceOver is running. The verbosity of this announcement can be configured in the Color Scanner Settings described below.
The device camera always adopts to the actual light conditions and the distance to the scanned object. This calibration process may take some seconds. A running process is indicated by the blinking of the scan focus and a calibration sound. The sound can be turned off in the Color Scanner Settings. During the calibration, the measured color values may significantly change. The color values are only correct after the calibration process has been finished.
Above the color details, there are the info button ![]() and the settings button
and the settings button ![]() . The info button leads to the info view presenting information about the app and the developer as well as this user manual. The settings button opens the Color Scanner Settings, which are described below.
. The info button leads to the info view presenting information about the app and the developer as well as this user manual. The settings button opens the Color Scanner Settings, which are described below.
Above the tab bar in the center, there is the fire button  . Tapping this button causes the camera to take a photo, which is sent to the Photo Scanner, which is described in the Photo Scanner section. The image quality of the photo can be set in the Color Scanner Settings. Depending on the image quality and the choosen camera, the process of taking the photo and sending it to the Photo Scanner may take some seconds.
Depending on your device, the torch button  and the change camera button
  may appear at the right of the fire button. The torch button turns the torch on and off and is only available, if the selected camera supports this. As an alternative, the torch can be also turned on and off by shaiking the device. On devices with more than one camera, the camera change button becomes visible and switches between the available camera devices.
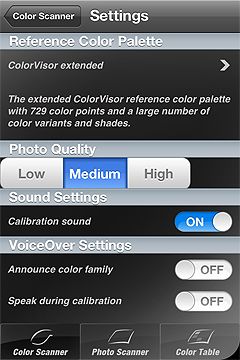 The Color Scanner Settings
Tapping the Settings button in the Color Scanner stops the color detection and opens the Color Scanner Settings. There, you find a number of options to configure the behaviour of the Color Scanner. The settings are devided into the sections Reference Color Palette, Photo Quality, Sound Settings, and VoiceOver Settings.
The first section presents the name and a description of the currently selected reference color palette. Tapping the name of this palette opens a list of all available color palettes. The current version of the ColorVisor provides three color palettes:
| ColorVisor basic: | The basic ColorVisor reference color palette containing only the basic colors and shades. |
| ColorVisor extended: | he extended ColorVisor reference color palette with 729 color points and a large number of color variants and shades. |
| ColorVisor classic: | The extended ColorVisor reference color palette with 729 color points and a large number of color variants and shades. |
Tap at the name of one of these palettes to select it as the reference color palette. The view will immediately return to the Color Scanner Settings after the selection. The back button at the top left of the palette selection view will also return to the settings, but won’t‘ perform any changes.
There is always only one selected reference color palette in the ColorVisor. This means that selecting a reference palette in the Color Scanner also holds for the Photo Scanner and the Color Table and the other way around.
In the Photo Quality section, there is a tab bar that provides three stages of image dimensions a photo can be taken with in the Color Scanner (see above). Photos taken in the „low“ mode contain only a reduced number of pixels. However, due to the small amount of data, the process of taking the photo and transfering it to the Photo Scanner will be very fast. On the other hand, the „High“ mode provides the best available image resolution, which might yield in an increase of processing time. The „Medium“ mode lays between this two extrem behaviours and it is the default setting. The actual image dimensions of a photo in a selected mode depends on your device and the selected camera.
In the Sound Settings section you are able to turn the playback of a calibration sound on and off. If this option is selected, which is the default, the sound will be played whenever the camera adopts to the actual optical conditions.
The VoiceOver Settings section provides two options. First, if „Announce color family“ is selected, VoiceOver will add the color family (see Color View section) to the announcement of the name of a detected color. The second option „Speak during calibration“ enables the color name announcement while camera calibration takes place. If selecting this, you have to take into account that color detection at the time of calibration is unreliable.
 The Photo Scanner
You can access the Photo Scanner by tapping the center button in the tab bar. At the top of the screen it shows either a photo or an image. Tapping on the image causes the colors to be analyzed at the touch position and the scan focus ![]() jumping there. The identified color is presented in the background next to the image. As in the Color Scanner, you will find the color details in the bottom right corner of the screen, containing the RGB components (left column), the HSB components (right column), and the color name at the bottom. The color names are retrieved from a reference color palette, which can be changed in the Photo Scanner Settings.
jumping there. The identified color is presented in the background next to the image. As in the Color Scanner, you will find the color details in the bottom right corner of the screen, containing the RGB components (left column), the HSB components (right column), and the color name at the bottom. The color names are retrieved from a reference color palette, which can be changed in the Photo Scanner Settings.
VoiceOver users will hear the color name spoken. The verbosity of this announcements may be configured in the Foto Scanner Settings as described below.
If you press onto the color details, the current color will be stored in the color table and the color view will be presented to you to allow further adjustments. The color view is described in detail later in the Color Table section.
Above the color details, there are the info button ![]() and the settings button
and the settings button ![]() . The info button leads to the info view presenting information about the app and the developer as well as this user manual. The settings button opens the Foto Scanner Settings, which are described below.
. The info button leads to the info view presenting information about the app and the developer as well as this user manual. The settings button opens the Foto Scanner Settings, which are described below.
You can change the zoom scale of the photo by using pinch-in and pinch out gestures. The image can be scrolled to a desired position by swiping up, down, right, or left and by moving your finger. VoiceOver users may change the zoom scale by swiping up or down and the image can be moved by using the VoiceOver scroll and panning gestures. VoiceOver always speaks out the current zoom scale and image section settings.
Above the tab bar on the left, you will find two more buttons, which are the save, and the load buttons. The save button ![]() writes the current image to the photo library, after asking for permission to do so. When tapping the load button
writes the current image to the photo library, after asking for permission to do so. When tapping the load button ![]() the photo library will be opened. You can choose a photo from there, which will appear in the Photo Scanner.
the photo library will be opened. You can choose a photo from there, which will appear in the Photo Scanner.
The Photo Scanner Settings
The Photo Scanner Settings provide only two options. First, you are able to change the currently selected reference color palette. The second option is to turn the announcement of the color family of a detected color for VoiceOver users on or off. Both options are equal to those of the Color Scanner and are described in detail in the Color Scanner Settings section above.
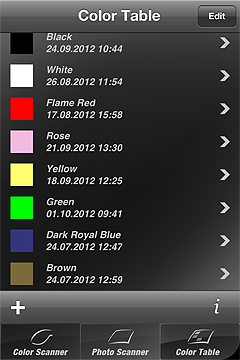 The Color Table
The Color Table manages the storing, editing, and creation of colors. You can reach it by tapping the right button in the tab bar. The table shows a list of saved colors. Right after installation, this list is empty or filled by colors that have been stored in iCloud before.
An entry in the color list shows a color space on its left side. Thereafter, you find the color name either by the beginning of the color notes or the creation date (if no notes are available). Selecting a color opens the color view with the setting of the selected color.
At the right of the header of the color list, there is a standard Edit button. By selecting it the Color Table changes into the editing mode, where you can delete or move around colors by standard means. Tapping the Done button returns to the normal mode.
If iCloud is activated on the device and if the „Documents and data“ option has been selected, all changes to the Color Table will be stored in iCloud. Then, all colors taht were edited on one device will also appear on other devices of the same user. There is no need of further synchronization. Additionally, after a reinstallation of the ColorVisor, the old content of the Color Table is restored automatically.
At the bottom of the Color Table, there is a toolbar ![]() including an Add button on the left and the Info button on the right. The Add button opens the Color View, where a new color can be created. The Info button shows information about the app and the developer as well as this user manual.
including an Add button on the left and the Info button on the right. The Add button opens the Color View, where a new color can be created. The Info button shows information about the app and the developer as well as this user manual.
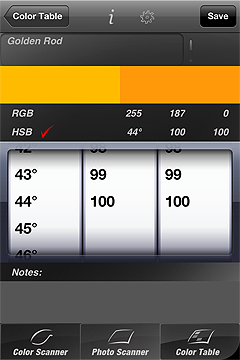 The Color View
The Color View offers the opportunity to create or modify a single color. There, color name and notes can be edited can be selected and color component values might be modified. Whenever the color details view in either the Color Scanner or the Photo Scanner is tapped (see above), the actual color is stored in the Color Table and this view will be shown.
At the top, right under the view header, there is a text field containing the name of the presented color. You can edit this name as you like by tapping ontu the text field. If the text field is empty, the name of the nearest color in the reference color palette is shown as default, instead. The editing of the color name field can be finished by tapping the Done button at the top left of the view or in the keyboard.
Under the color name field and the color family button, there appears a color field. The left part of this field shows the actual color according to the selected color component values (see below). The right part of the color field constantly presents the color at the state of the last saving.
At the center of the Color View, the RGB and HSB component values and three selection wheels are placed. A Checkmark at the left of either the RGB or HSB values indicates the actual editing mode performed by the selection wheels. Tapping ontu RGB or HSB changes the editing mode, accordingly. You can modify the color component values by spinning the selection wheels up or down. The RGB values Red, Green, and Blue range from 0 (the component is not present) to 255 (the component has full strength). The HSB components are constituted by Hue, Saturation, and Brightness. Hue ranges from 0 to 360 degree. Saturation and Brightness are values between 0 and 100%, instead.
While changing the color component values, the nearest color in the reference color palette is obtained in the background. Whenever this nearest color do change, the color name field at the top will be cleared and the new name will be presented as default
At the bottom of the Color View right above the tab bar, there is a text field for capturing notes. After tapping ontu the notes field, the keyboard appears to allow you text input. The keyboard may be hidden by tapping the Done button in the upper left corner.
The head of the Color View ![]() consists of the Back button on the left, the Save button on the right, and a toolbar in between, which contains four more buttons.
consists of the Back button on the left, the Save button on the right, and a toolbar in between, which contains four more buttons.
The Back button closes the Color View and returns to the Color Table without saving any changes. The Save button will be enabled only if some changes to the presented color have been occured. It saves the changes in the Color Table and closes the Color view as well, afterwards. If there were changes to the color component values, which is indicated by different colors in the color field, a new entry in the Color Table will be created. The old entry will be kept untouched.
The toolbar between the Back and the Save button contains the Info button and the Settings button. The Info button presents information about the app, the developer as well as this user manual. The Settings button opens the Color View Settings, where you may select an Alternative reference color palette as already described in the Color Scanner Settings section.